Managing Customers
1. Creating a New Customer
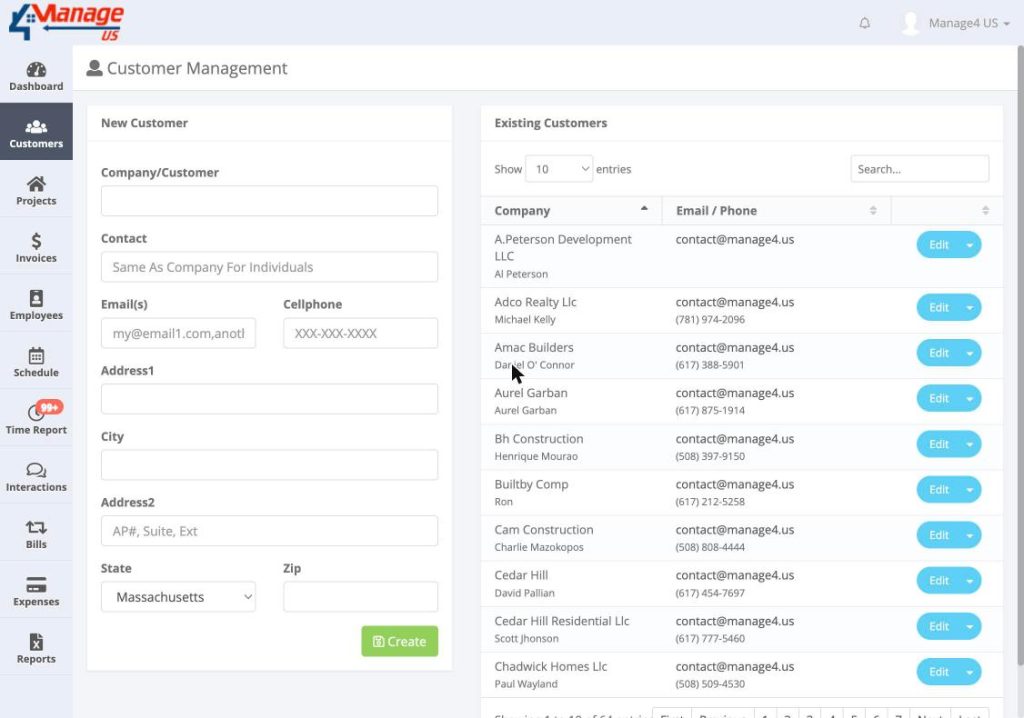
Step 1: Access the Customers Screen
Navigate using the left sidebar and select Customers to open the management page.

Step 2: Fill in the “New Customer” Form
On the left side of the screen you will find the New Customer form. Complete the following fields:
- Company/Customer (Required) – Name of the company or customer.
- Contact (Required) – Name of the contact person; for individuals, this can be the same as the company name.
- Email(s) (Required) – You can enter one or more emails separated by a comma.
- Cellphone (Optional) – 10-digit cell phone number (the system validates the format).
- Address1 (Required) – Primary address.
- Address2 (Optional) – Complement (Apt #, suite, etc.).
- City (Required).
- State (Required) – Selectable via dropdown; Massachusetts is pre-selected.
- Zip (Required) – 5-digit postal code.

Step 3: Validate Required Fields
If you click Create without filling in the required fields, the system will display red error messages indicating which information is missing. Fill in all required fields; optional fields can be left blank.
Step 4: Save the New Customer
After completing the form, click Create. The customer will be added to the Existing Customers list and can be viewed immediately.
2. Finding / Reading Existing Customers
The “Existing Customers” List
On the right side of the screen there is a table listing all registered customers. Each row shows the company, contact person, email, phone number, and an Edit button.

Searching for a Customer
Above the table there is a Search… field that filters results in real time. You can type part of the customer’s name, email, or phone number to quickly find the desired record.
Navigation and Sorting
You can adjust how many entries appear per page (10, 25, 50, or 100) using the Show X entries selector. The table columns also support ascending/descending sort by clicking their headers.
3. Updating a Customer
Step 1: Open Edit Mode
In the customer list, click the Edit button on the row of the customer you want to update. This will load the Edit Customer form with the current data.
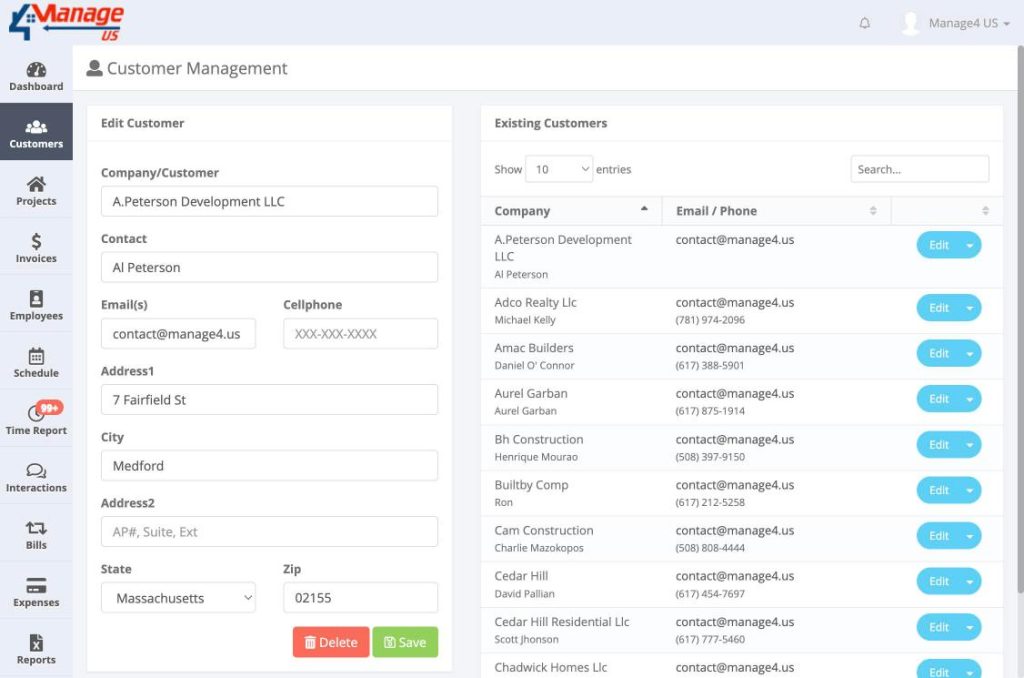
Step 2: Make Changes
Update the necessary fields. The same required fields from the registration form apply here. If you remove any essential information, the system will flag the field before saving.
Step 3: Save Changes
Click Save to update the record. The customer will return to the list with the updated information. If there are validation errors (such as empty required fields or phone numbers in an invalid format), they will be displayed and saving will be blocked until corrected.
4. Deactivating / Deleting a Customer
Understanding the Limitations
Not all customers can be deleted. If there are invoices or other linked records (such as financial reports), the deletion is blocked. In this case, when you try to delete, a message such as “This customer has invoices and can’t be deleted” will appear and the delete button will have no effect.
Executing the Deletion
Inside the Edit Customer form, a Delete button appears next to Save. When you click Delete, the system checks if the customer is eligible for removal. If there are no dependencies, a confirmation dialog is shown. Confirm the deletion to permanently remove the customer from the database.
Alternative: Deactivate
If the system offers the option to deactivate instead of delete, use the actions menu (usually identified by an arrow or three dots) on the customer’s row and select Deactivate. This marks the customer as inactive and they will no longer appear in the default view, while preserving the transaction history.